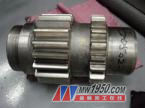
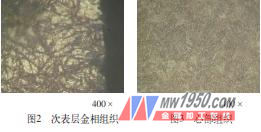
The material of the boring machine shaft gear produced by a company is 18C r2N i4W. The heat treatment technology requires carburizing and quenching of the tooth. The effective hardened layer depth is 0.9 to 1.2 mm, the surface hardness is 58-62HRC, and the core hardness is 30-36HRC. . A batch of products undergoes tooth grinding during the installation test, as shown in Figure 1, we performed a failure analysis. Chemical composition Whether the chemical composition of the re-inspected materials meets the requirements of the parts, the test results are shown in Table 1, and the chemical composition meets the standard requirements. Table 1 Chemical composition of defective parts (mass fraction) (%) 2. Hardness testing (1) Effective hardened layer The effective hardened layer depth and hardness of the failed part are shown in Table 2. The effective hardened layer depth is about 0.95 mm, which is the lower limit of the technical requirements. Table 2 Effective hardened layer depth and hardness gradient (2) Hardness The surface hardness of the failed parts is 53-55HRC, the core hardness is 36~40HRC, and the surface hardness is lower than the technical requirements. Since the hardness of the tooth surface of the shaft gear does not meet the technical requirements, the hardness of the gear meshing with the shaft gear is higher than that of the shaft gear, so that the external force received by the shaft gear during the operation exceeds the yield limit, and the bearing capacity is significantly reduced, which is relatively easy to lose. Plastic deformation occurs due to the resistance of deformation. Therefore, the tooth portion exceeds the yield limit during the meshing process, so that the surface cannot rebound and cause grinding, which reduces the service life. 3. Metallographic examination The purpose of metallographic examination is to analyze the distribution and nature of various defects and to analyze the causes of the defects. (1) Non-metallic inclusions According to GB/T10561-2005 "Micro-inspection method for the determination of non-metallic inclusion content in steel", the non-metallic inclusions of the failed parts are D3. (2) Metallographic structure The carburized subsurface metallographic structure is coarse tempered martensite and a large amount of retained austenite, as shown in Fig. 2, martensite and retained austenite grade 6, carbide grade 1. The heart tissue is a grade 1 lath martensite and ferrite, as shown in Figure 3. 4. Conclusion (1) The metallurgical quality of the shaft gear material is poor, and the non-metallic inclusion is serious, which destroys the integrity and continuity of the metal matrix. (2) The tooth surface hardness of the shaft gear does not meet the technical requirements. (3) There is coarse martensite and a large amount of retained austenite in the surface layer of the shaft gear, resulting in insufficient surface hardness of the shaft gear.
China Angle Straightening Machine Suppliers
HYDRAULIC Straightening machine
Applicable Industry:Used for Straightening of angles in the field of steel tower industry.
The equipment possesses independent hydraulic power system and electric controlling system.
Bar Straightening Machine,Angle Straightening Machine,Sheet Straightening Machine,Steel Bar Straightening Machine Shandong EN FIN CNC Machinery Co., Ltd , https://www.sdfincncmachine.com


